

Introduction
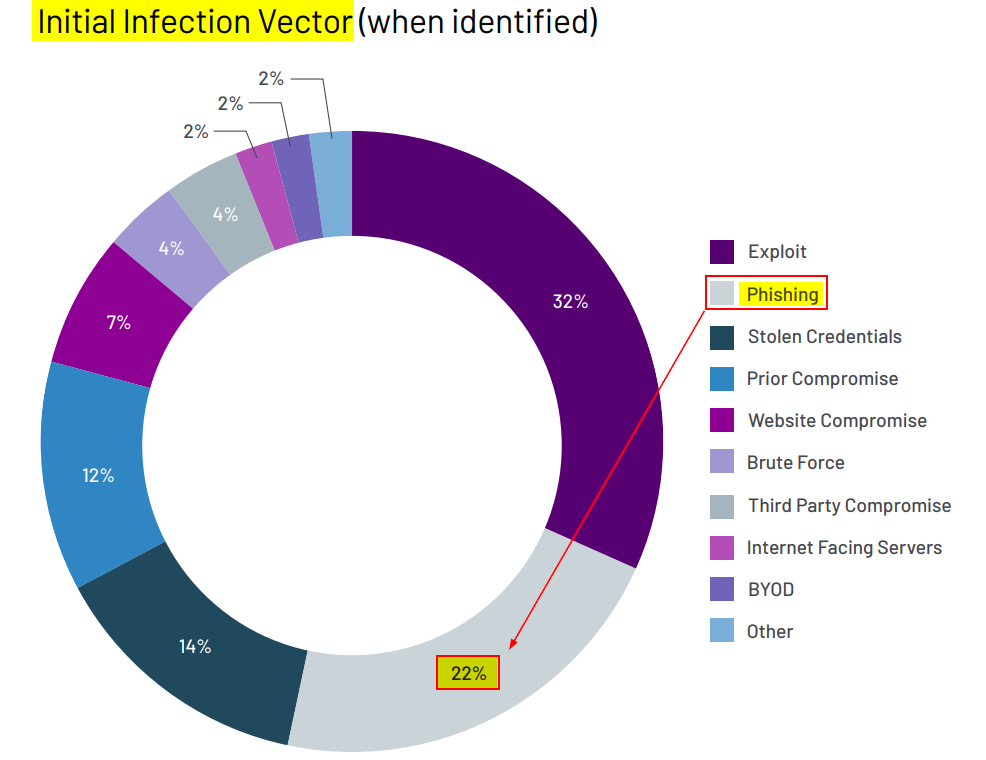
Phishing continues to be a lucrative vector for adversaries year after year. In 2022, for intrusions observed by Mandiant, phishing was the second most utilized vector for initial access. When Red Teaming against mature organizations with up-to-date and well configured external attack surfaces, phishing is often the method of initial access.
To give the readers a recent example, I was on an engagement where one of the goals was to bypass MFA and compromise a user’s Office365 account. The target had implemented geo-location based restrictions, MFA for users, and conducted user awareness trainings. To get past these controls, a customized version of Evilginx was hosted in the same country as the target. This server was protected behind an Apache reverse proxy and Azure CDN to get through the corporate web proxy. The phishing email contained a PDF, formatted to the target’s branding (from OSINT) with a ruse that required users to re-authenticate to their Office365 accounts as part of a cloud migration. The phish was sent using Office365 with an Azure tenant, which helped get through the email security solution (more on this later). The campaign began, and eventually a user’s session was successfully stolen, resulting in access to business critical data. Interestingly, although a few users reported the phish, the investigating security analyst did not identify anything malicious about the email and marked the reported phish as a false positive. The engagement concluded with valuable lessons learnt from identifying gaps in response processes, user awareness, and an ‘aha moment’ for the executives.
Reel It In: Landing The Phish
Landing an email in a recipient’s inbox can be a challenge, for both cold emailing and spear phishing. To avoid getting caught in spam filters, it’s important to follow a few best practices.
- Use a domain that is aged and categorised
Never use typosquatted target domains. For instance, Mimecast has an ‘Impersonation rule’ to prevent typosquatted domains from landing in an inbox. Instead, purchase an expired domain that resembles a vendor that may be related to the target. For instance, ‘fortinetglobal.com’ or ‘contoso.crowdstrikeglobal.com’.
I tend to rely on Microsoft’s domains. Azure tenants provide a subdomain of ‘onmicrosoft.com’. Alternatively, you could rely on Outlook (‘@outlook.com’), and impersonate a specific user from the target, such as IT support. Rely on your OSINT skills to identify the email naming syntax, signature, and profile picture of the user you want to impersonate.
- Use a reputable email service provider to send the email and avoid sending from a suspicious domain or IP address
Most RT shops use reputed providers such as Office365, Mailgun, Outlook, Amazon SES, or Google Workspace. Some folks still use their own Postfix SMTP server. To avoid blacklisted source IPs, you may want to use a VPN on the host you use to send emails.
Enumerate the target’s DNS TXT records to identify allowed third-party marketing providers. A quick Shodan lookup of the allowed IPs should identify the associated vendor. Rely on the same service to send your phish, for example, Sendgrid or Klaviyo.

- Set up essential DNS records
Sender policy framework (SPF): Identifies the mail servers and domains that are allowed to send email on behalf of your domain.
DomainKeys identified mail (DKIM): Digitally sign emails using a cryptographic signature—so recipients can verify that an email was sent by your domain and not spoofed by a third party.
Domain-based message authentication (DMARC): Allows email senders to specify what should happen if an email fails the SPF record check —for example, whether it should be rejected or delivered to the recipient’s inbox.
- Avoid using spam trigger words in the subject line and content of the email
Words such as Free, Prize, Urgent, Giveaway, Click Here, Discount etc. are associated with spam or unsolicited email and cause your email to be automatically sent to Junk or not delivered at all.
- Establish a mail chain with the target before sending any links within the email.
I prefer to send my phishes in three stages. For instance, on a Friday I’d send a ‘Downtime Notification’ informing users that they may need to re-authenticate to their accounts after a scheduled maintenance activity. This email would not contain anything suspicious—no links, no action required—it’s only informational. The following Monday, I’d reply to the same email thread, with the phish requesting users authenticate on the provided link. On Tuesday, I’d send a ‘Gentle Reminder’ email, once again replying to the same mail thread. The user compromised from the example in the introduction section was phished with the ‘Gentle Reminder’.
For a targeted attack, it’s recommended to establish two-way communication with the user before sending the main phish.
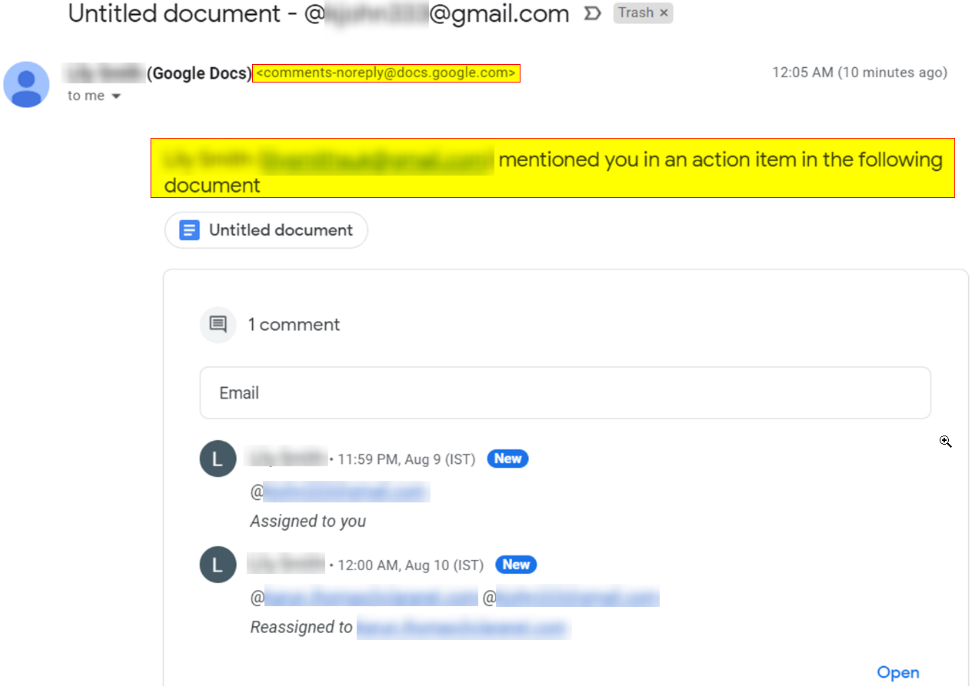
- Be creative with collaboration functionality to land the email
With Google Workspace: Create a document themed according to target’s branding → Embed payload URL within sheet → Add victim as ‘Commentator’ → Victim receives an email from ‘[email protected]’
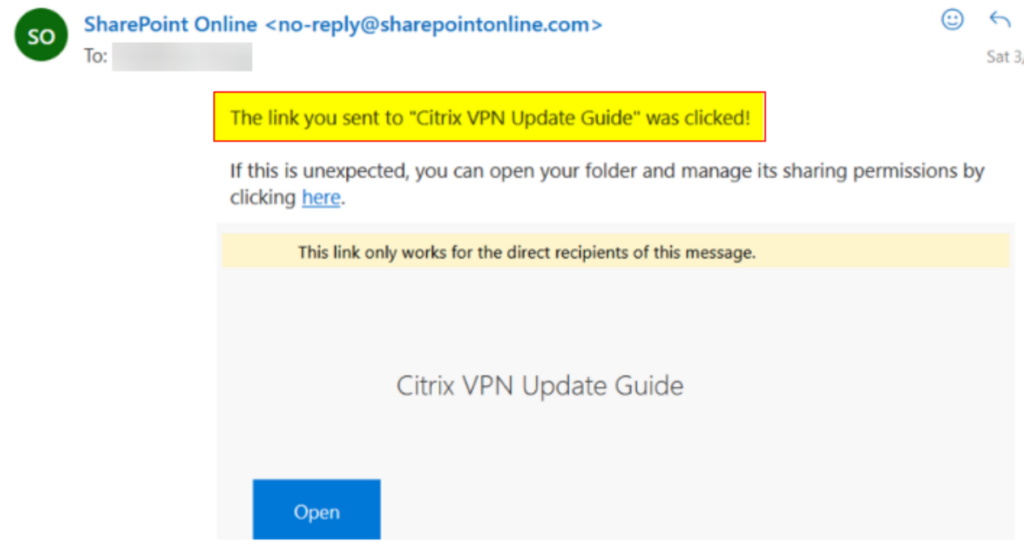
With SharePoint: Create a folder or document themed according to target’s branding → Embed payload URL within sheet → Provide only read access to anyone with the URL → Share the folder\file with victim’s email ID → Embedded link is a subdomain of ‘sharepoint.com’.
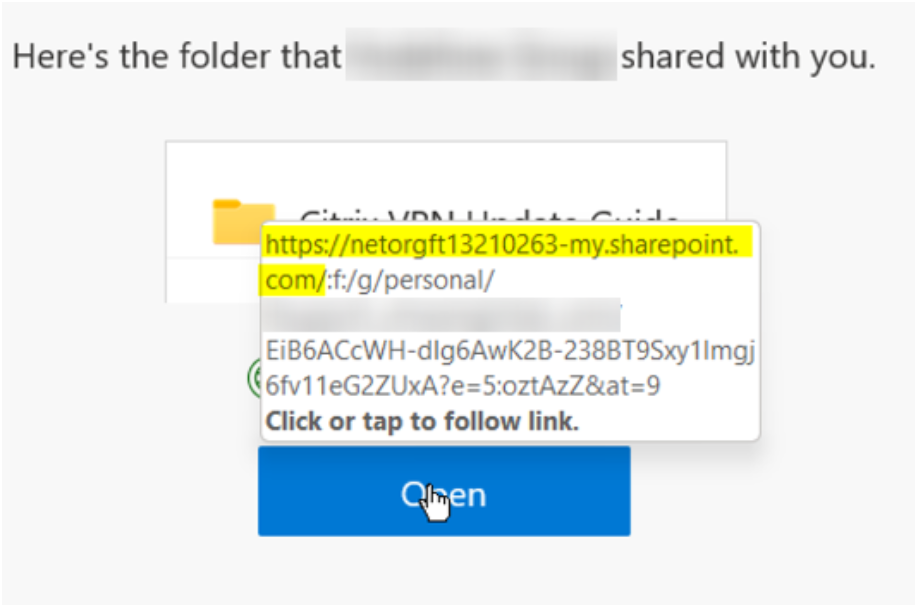
Personally, I’ve had better success landing shared files instead of shared folders on SharePoint. SharePoint also provides notifications when users access the document.
- Don’t send your payloads as attachments, obviously
Instead, provide a link in the email, redirecting the user to the site that’s hosting the payload. Using your own website provides benefits such as user\bot tracking and quick payload swaps.
Use JavaScript to hide the payload from the <a href=””> tag, and download based on an event such as onclick().
Alternatively, Azure blob storage, Azure app services, AWS S3 buckets or IPFS are worth considering.
- Perform a dry run spam check
Use ‘https://www.mail-tester.com’ and Azure’s message header analyzer. Note that just because you get a 10/10 score, does not mean you will land the phish in your target’s inbox.
This brings us to the idea of email sender reputation.
Warm It Up
Email sender reputation refers to the perceived trustworthiness of the sender of an email, as determined by various email service providers and spam filters. This reputation is based on a number of factors such as the sender’s email address, the content of the email, and the frequency and consistency of sending emails.
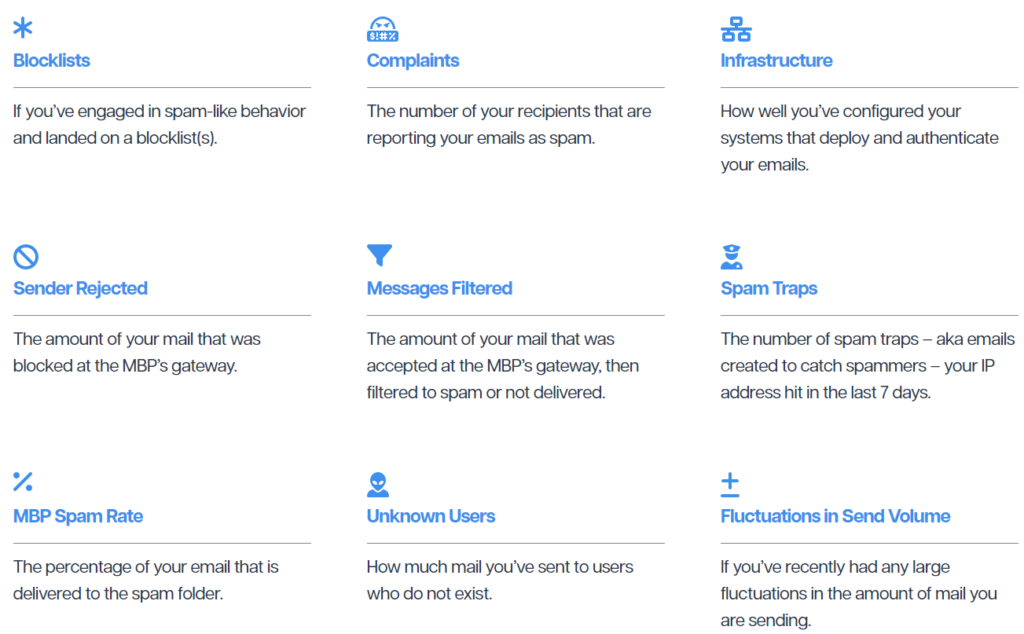
When new senders appear, they’re treated more suspiciously than senders with a previously-established history of sending email messages (think of it as a probation period).
For instance, if you try to send more than 20 emails right after creating a new Azure tenant with Office365, you may come across these errors:
Your message wasn't delivered because the recipient's email provider rejected it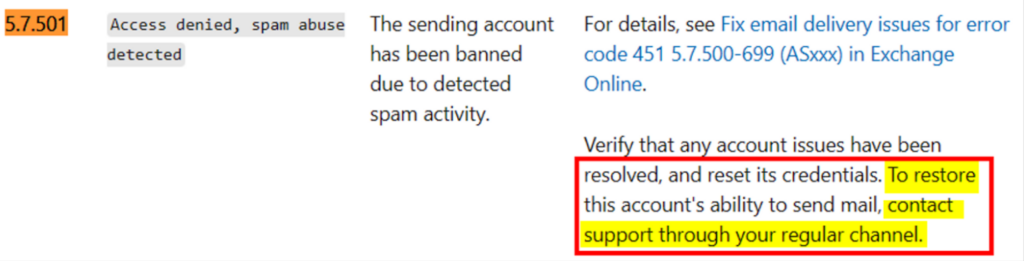
This error occurs when sending emails from known, low reputation IP addresses that are typically used by new customers on trail tenants (one month trial license or new license). To fix this issue, your tenant needs to be added to a sending exclusion for 60 days to allow them to use blocked IPs whilst they still have a new/trial license. When you reach out to Microsoft’s support team, they perform a diagnostic test and release the traffic from the blocked IP, so you can continue sending email.
If you’re on a trial license for Azure and Office365, your domain will be heavily scrutinized. Purchase a license for both these services. Keep in mind that Azure tenants with an age of less than 60 days are still treated as new.
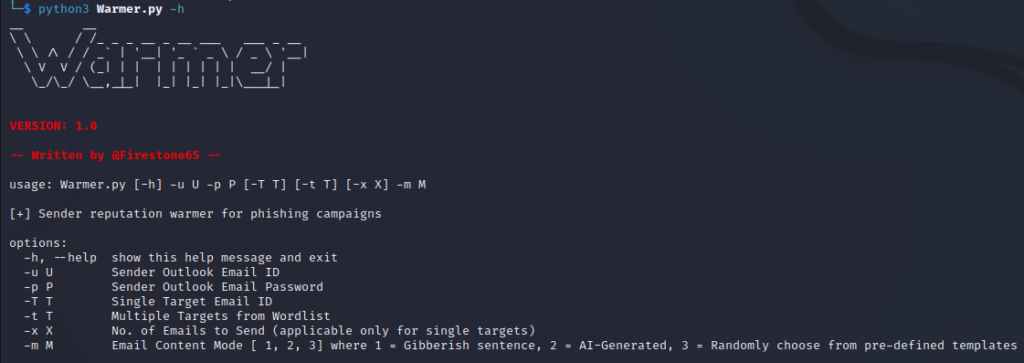
By utilising Warmer, a custom script created by Karun John Thomas (@Firestone65), we’re able to automate the warmup process. The script uses Selenium and Python to emulate human-like behavior and send emails through browser automation. Other notable features include:
– AI generated warm-up emails to replicate human conversations
– Support for Office365
– Scheduling to automated warming for an entire month at one-go (Planned update)
– SMTP support for Mailgun and Amazon SES (Planned update)
It’s a good idea to create 5–10 email accounts using multiple domains and use them with the Warmer script. It may be helpful to send emails to different email providers.
During the warm-up period, it is important to focus on gradually increasing the volume of emails you send. Start by sending five daily emails during your first week—gradually increasing that number over the first month (e.g., by 10-20% every few days). However, there is no set timeline or specific number of emails that will guarantee a positive reputation. Based on the volume of emails you’re sending during warm-up, it may take several weeks or even months to build a very good email reputation.
python3 Warmer.py -u [email protected] -p <pass> -t send_to_list.txt -m 3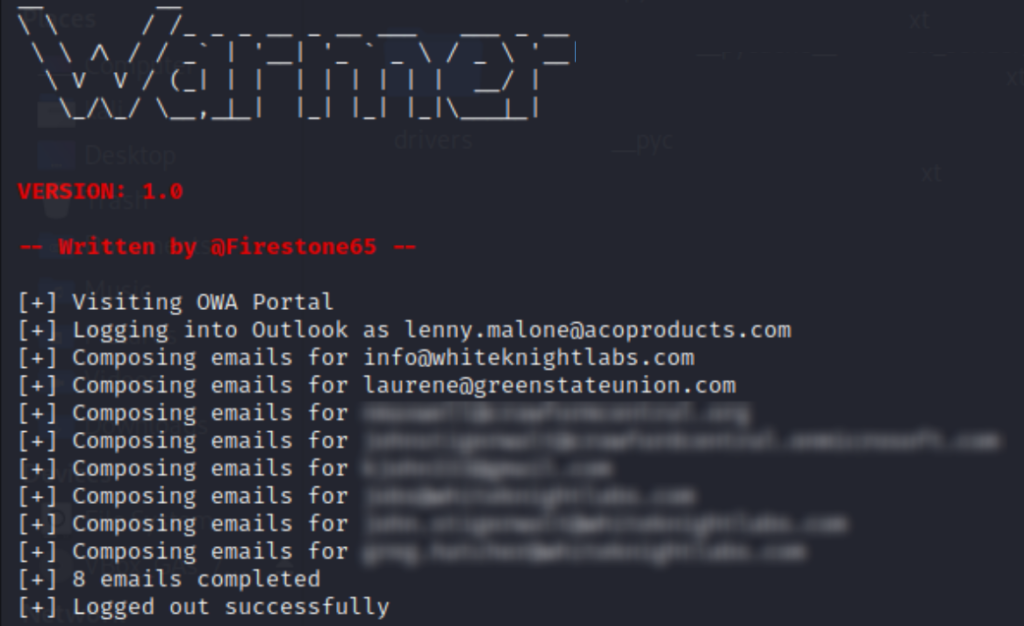
Here’s a short demo where Warmer.py automates sending an AI-generated email to a specific account.
Alternatively, paid warmups are well discussed by email marketing solutions.
Closing Thoughts
Sending and receiving emails from the accounts you control on your domains can help increase your email sender reputation, but it is not a guaranteed or proven technique on its own. It can be helpful in building a positive sender reputation, but it’s just one part of an overall email sending strategy.
It goes without saying that individuals and companies must obtain proper consent when necessary, and they should not use these techniques for malicious purposes.
I will conclude with a quick note on phishing assessments.
These are great to assess key areas such as user awareness, what payloads can be delivered, susceptibility to payload execution and incident response processes.
Metrics ( i.e., the numbers of users who opened/clicked/phished/reported) establish a baseline of risk from the percent of users compromised, and provide the business insights into what’s driving this, such as the effectiveness of security awareness training. While your standard phishing simulations are beneficial, technically the percent of users compromised doesn’t matter since any value above zero is a failure. Here’s the epiphany, we will never get to zero. If a user clicking a link burns down the organization, it’s not the user’s fault. You have bad security.